Monday 24 March 2014

Worm Farm in a Bath

I wanted a worm farm that would be cheap, easy to look after & give me lots of the good stuff - worm tea plus vermicasts.

I looked around on the internet and decided to put one in an old bath.

Here's what I used:

  • An old Bath
  • Scraps of wood to make a frame. You could use concrete blocks for this. It's important to have it high enough to be able to put a container underneath the plug hole to collect the tea.
  • stones for drainage
  • A lid. Corrugated iron or an old piece of ply will do.
  • A liner. I used permeable weed mat, non-woven kind
  • Straw
  • Compost
  • Food - vegetable scraps
  • Old sacks or newspapers torn into strips for a top layer
  • Worms - about 1 litre of them
  •  Build a basic frame for the bath. I wanted to be able to work at it without bending over & putting my back out, and use it as a potting bench as well, so made it reasonably high. 
  • Put it in a spot which is not going to fry in summer or freeze in winter. Mine is on the south (non-sunny) side of a garage. It's in a courtyard with white gravel which keeps the temperature quite even.
  • It will become quite heavy so you don't want to have to move it around after it's set up.
  • In winter I will cover it with an old blanket as extra insulation.
 I had a collection of stones from out of the vegie garden so this was a great way to use them.They are for drainage and will allow all the worm tea to percolate down to the plug hole.
Next weed mat to stop the worms & composting material from clogging up the stones
Straw goes in next, as a base material for aeration & bedding for the worms. You could also use torn up newspapers. Wet this layer thoroughly.
2 wheelbarrows full of not-quite-ready compost went in next (that's all I had, you could use finished compost as well) with some fresh food scraps mixed in to the top layer.
The essential ingredient, worms! You can buy these online. Make sure they are actual compost worms.
A protective layer, to keep the contents damp. You could use hemp sacks, I used damp, shredded newspapers.
And there it is! I've got an old piece of ply on top. We drilled holes in it to allow air to circulate. You could also use corrugated iron, which would repel the  rain better, which I will keep an eye out for, but don't want to go and buy some especially. I have to put another piece on top when it rains, as too much water goes into the bath. You also need some sort of container under the plug hole to catch the tea.

To use the tea, mix it 1 part tea to 10 parts water, or it will be too strong for your plants. They will absolutely love it, it's a real tonic for them, especially potted plants.

Notes:
  • Feed the worms a 2 litre container of scraps every week or so. Note that it may take a couple of weeks for the worms to start work. They need to get acclimatised first. 
  • Keep an eye on how fast they eat the food, you may need to feed more or less. Remove any food that goes mouldy and put it in the compost.
  • Concentrate on feeding one end of the bath at a time, and when it's full (up to a year), feed at the other end. The worms will move down there, and you will be able to harvest the casts (worm poo) from the original end after a week or so. Take it out carefully with your hands so you don't take any worms as well, and refill that end with compost. 
  • Use the vermicasts as a component of home-made potting mix (1:1:1 Vermicasts : Sand : Mature compost) or sprinkle it around plants as plant food.
There it is. If you have a go, & please let me know how yours turns out & anything you did differently!


Saturday 22 March 2014

DIY Mini Shade House or Greenhouse

Around Kirwee, there are a lot of cropping farms, and we get a huge number of white butterflies. If you want to grow brassicas (cabbage, cauliflower, broccoli etc), you need to either use a lot of derris dust, or protect the plants with some kind of barrier.

I spent a lot of effort growing my seedlings from seed & really don't want to use any kind of chemical input. Derris dust kills everything it comes into contact with, including bees, so thats another reason.

Bought tunnel houses can be pretty expensive, so I decided to build my own. My husband is an electrician, so I had access to some conduit tubing, which is ideal. The question was how to put it together & stick it in in the ground. I came up with the idea of using reo (reinforcing steel). My idea was to use shortish lengths stuck into the ground with enough length above ground to put the conduit over it. I got a 6 metre length of reo from the hardware store, smiled sweetly at the big strong men & they cut it up for me into 8 x 750mm lengths (no charge!). I figured that 4 conduit tubes along each side of my 4.5metre beds would be about right. Then I needed an additional length which would be the centre pole & go the whole length of the frame.
Here are the pictures of how I put it together.

 Cutting the 6 metre length of reo into 8 equal parts means they are 750mm each. I worked it out in my head, but the big strong hardware men had to get a calculater... Here I've stuck it into the ground. I didn't do it right into the corner because I thought it might get a little loose against the wooden sides.
Here it is with the conduit on top of it. The curve of the conduit against the strength of the reo holds it on really tight. You need a bit of muscle to bend the conduit over to the reo on the other side.
I used 2 x T conduit connections, one at each end to hold the centre piece firmly. It didn't want to slide on very easily, but we got there with a few gentle taps with a hammer.
Where the centre piece meets the 2 inside struts I used electrical cable ties. I should have made sure the little connection piece was on the underside, but covered it over with insulation tape so it wouldn't catch on the shade netting & tear it.

Now the frame's finished and ready for the cover. I bought this at the hardware store too.
I love it, & love seeing those ratbag white butterflies trying to get in! When I want to get into it I use clothes pegs to lift up the end or side so I can work in it. It's really cosy inside, and I think the temperature is a little warmer in there too.

It's autumn now, so I think it will help ripen the tomatoes & peppers. It doesn't seem to have been a very good summer this year, so hopefully my shade house will help extend the season. This is the second frame I've built like this, the first one is 2 years old I've had no problems with it. I covered that one with a sheet of plastic to make a small greenhouse (again from the hardware store). It's great for growing lettuces & other salad vegies in the colder season & to get an early start in spring.

The great thing about these frames is that since I have 4 beds of identical size, I can easily dismantle and reassemble them over whichever bed I need them on, following my rotation system.

Monday 3 March 2014

Chickens

I've always wanted laying hens but didn't have enough space when we lived in town. I've come to realise now that we really didn't need that much space. Here's what I did... To start with, we only had 2 hens, brown shavers, bred to lay almost daily. They were lovely & friendly.

We got 2 kittens about the same time who thought the hens were very interesting and they practiced stalking them, but the hens would give them a sharp peck if they got too close.

We built a chicken tractor. A chicken tractor is an enclosed run that will fit neatly on your garden beds. The hens lived in it and it really was just like a mini tractor. They turn over the soil, eating bugs, weeds and remnants of plants, while depositing their manure and giving you eggs. Its a win win!
(This is not the hens)


We throw kitchen scraps in with them, plus garden waste, and they love to dig it over! The kittens love to watch the action. It's made of scraps of electrical conduit, a tarpaulin and some cable ties. (Hubby is an electrician, but you can get these from any electrical supplier) We made it to fit exactly onto one half of the long beds. It worked so well!
 Sometimes we put it on the lawn, but not for more than 2 days in the same place or they'll dig holes.
 
Unfortunately a neighbours dog got in while we were out. They can be really vicious. I was gutted, but hooked on poultry, so decided to start again, and bought a hen with 8 chicks online. They were so cute! But they wouldn't all fit in the tractor once they got big, so we decided to fence off the orchard area for them. If you keep poultry in your orchard, they will eat the fallen fruit, plus dig for the codling moth larvae and other bad guys which live underground. Needless to say, they will also fertilise the orchard & give you eggs! If I was a hen, I'd like to live here :)

We used 2 metre high standards & 2 rolls of 1 metre wire (originally thought that 1 metre high would be enough, but after the dog incident decided to go higher. We should have bought 2 metre wire!) We were lucky to have a small child's playhouse in the orchard already, so put in a couple of perches and added 2 nesting boxes plus wood shavings on the floor. Perfect!

The chicks soon grew, and got bigger than their mum. 3 of the 8 chicks turned out to be boys and  unfortunately we aren't allowed to have roosters in our area, so they had to go. We got 2 more brown shavers as we weren't sure how the chicks would go at laying as they were all bitsers. It was wonderful, like a real farmyard! The chicken tractor is in there at the moment, as we put any broodies in there to keep them out of the nesting boxes and keep their body temperatures down so they get over it quickly, plus the vegie garden is full of vegies at the moment.

We had a massive storm last October, which took out a couple of trees, and one of our brown shavers must have had a heart attack as she was dead under her perch the next morning. It's sad when these things happen, but you move on! Our latest thing is that our favourite hen, Maude, went broody, so we put her in the tractor with some fake eggs to sit on. After a couple of weeks (should really be 21 days, but she didn't seem to mind...) we took the fake eggs away and put in 5 x day old chicks. She was over the moon! Unfortunately the chicks didn't know what to do. A real problem as it was going to be a cold night. So our solution was to put some wood shavings in a bird cage, put the chicks in, then put Maude on top. We covered them over with a blanket, and left them to it for the night.

Phew! They soon got the message that this was 'Mum', and she would keep them warm, and they've been happily living in the chicken tractor with her ever since.

You can see in the pictures that the orchard is no longer the lush green area it once was. Poultry and pretty lawns don't go together I'm afraid. I've just had to come to terms with that, and we've now fenced the orchard into 2 areas, which we will alternate them in, for 6 weeks or so in each so that it has a chance to recover!


Friday 21 February 2014

Tea, anyone?

I have a wish list of what I want to have in my garden. I'm doing this on a budget, and don't want to add any  pesticides, herbicides or other poisons. This is food after all and I need to be able to feed it to my family! My next project was to make some tea. Not tea that you'd want to drink though. This will be plant food. An instant boost to my plants to keep them in tip top shape.

This is just a regular rubbish bin you can buy at a hardware shop. When I bought it, I also bought a tap. I drilled a hole a few inches above the base, and inserted the tap (the instructions were with the tap). That's it, all I needed to do to set it up. I set it up on some old bricks (they really do come in handy!) so that I could get a watering can under the tap, then got the hose to it & filled it to about 6 inches from the top. Next, I filled it with lovely nutrient-rich stuff. I got salmon heads & fish skeletons from my brother-in law, added comfrey leaves, (this is a great plant, with a really long tap root which mines the nutrients from way down in the soil/subsoil and brings it up to store in it's leaves). I also added leftover bones from the kitchen, some twitch/couch grass (that I normally would put in the rubbish bin as it will regrow even from tiny pieces of root and the compost doesn't always kill it), and other food scraps that I didn't want to compost. The meat bones I put into a net bag like you get when you buy oranges, and tied a piece of string to it. Use quite fine string, as if your string is too think, there will be a gap between the lid and the bin, which will allow flies to get in.

I tied the other end around the handle of the bin so I could take the bones out after the flesh is gone, without putting my hand in the goop. Otherwise the bottom would get clogged with old bones. Plant material should break down totally as long as you don't put wood in there. Rinsed seaweed is another excellent ingredient if you can get hold of it. Finally, I put the lid on & left it, adding to it whenever I had something suitable to dispose of.

Well once this lovely mixture had steeped for a few months, I started using it. Mmmm! Before you apply a mixture like this you must water the garden, then dilute it 1 part to about 5 parts of water in your watering can. The tea is too strong to apply straight, and will burn your plants. It's great on fruiting plants like tomatoes which are really hungry, and also as a foliar spray, where you put it in a misting bottle & spray directly onto the leaves. Do this on a cloudy day, or in the evening so it doesn't burn.

Such an easy way to make your own plant food, and a great way to reduce and recycle the waste you produce.

Thursday 20 February 2014

My No-Dig Garden

 We moved into our home in December 2011. It had been a topsy turvy year of earthquakes. Everyone (& everything) was quite unsettled. My dream had always been to live in the country on a lifestyle block, of a couple of acres, grow my own food, have a few animals and be as sustainable as possible. We had to settle for something a bit smaller, about 3/4 of an acre, but I knew from the moment I first saw it that this was the place!

It had large lawns, a sunny deck, and an orchard area. Here are some pictures of what it was like then.

Lovely, wasn't it? My son saw me sketching and scheming and begged me not to mess it up. Who would put their veggie garden right in front of their outdoor living area? 'Leave it as it is' he said. Well, I did have my doubts, but I knew exactly what I wanted.

What I wanted:
I wanted a cheap, low maintenance (no digging) vegetable garden, that was pretty, visible and accessible  from the house, not tucked away down the back corner. My thinking here was that if it was always in front of me I couldn't ignore it! I wanted to have a continuous supply of vegetables that I knew had not been sprayed with any nasties. It would be nice to be as self reliant in vegies as possible. I really like the whole permaculture thing & will implement these ideas in the garden. Permaculture means permanent agriculture. The idea behind it is that energy stays on your property. You work with nature, rather than fighting it, starting with looking after your soil.

What I used:
Cardboard Boxes - enough to cover the entire area, beds and paths. I have seen a lot of gardens like mine where they leave the paths in grass. It looks great for a while, but the grass is hard to cut, and before too long it starts to invade the vegetable beds. Be warned!  I collected all the cardboard boxes we'd used when we moved in. There weren't enough, so I raided several supermarkets as well. You could use newspaper instead, but would have to have a lot of thickness. The staff at the supermarket thought I was bonkers filling up the car with their rubbish, but it saved them having to get rid of them, so were all quite happy for me to help myself. A quick note here, try and get boxes as big as possible, and not the ones with lots of holes in them.Flatten them out and remove sticky tape (quick note; get your kids to help - take away their ipods or pacifier of choice until it's done. It won't take long!) The idea with the cardboard is to cover the grass & kill it off, stop weeds coming up, but to allow your plant roots to go down through it, as by that time it will be rotting. All adding to the good stuff in your beds!

Something to separate the paths from the beds. I used wood, 4.5 metre lengths of 10" x 1". For later beds I used large stones, about the size of a brick. Upended wine bottles, old pieces of corrugated iron, bricks, old pallets, logs - look around and see what you've got before shelling out.
Something for the paths. Shredded bark was the cheapest option for me. Bark chips, straw, pebbles (these would work out quite expensive, but would look lovely!) Anything you can walk on. Bear in mind that if it is a plant-based material, it will break down over time & need to be topped up. We hire a chipper once a year and put pruned branches through it which provides material for the paths.
Bricks I used old bricks to hold down the cardboard, and later used them as an edging between the garden area and the lawn.

What I did:
The first step was to mark out the area I wanted to turn into my vegetable garden using pegs and string, and water it well. I chose a north-facing, sheltered site (or south facing in the northern hemisphere) to get the maximum sun. Next, I laid out the cardboard with a couple of inches overlapping. Important to prevent light from reaching the grass, which is pretty persistent stuff & will grow throw a gap if given the chance. Here's how I laid them out. I used old bricks to hold them down. I kept the water going while I was doing it. It was lovely and refreshing on a really hot day!


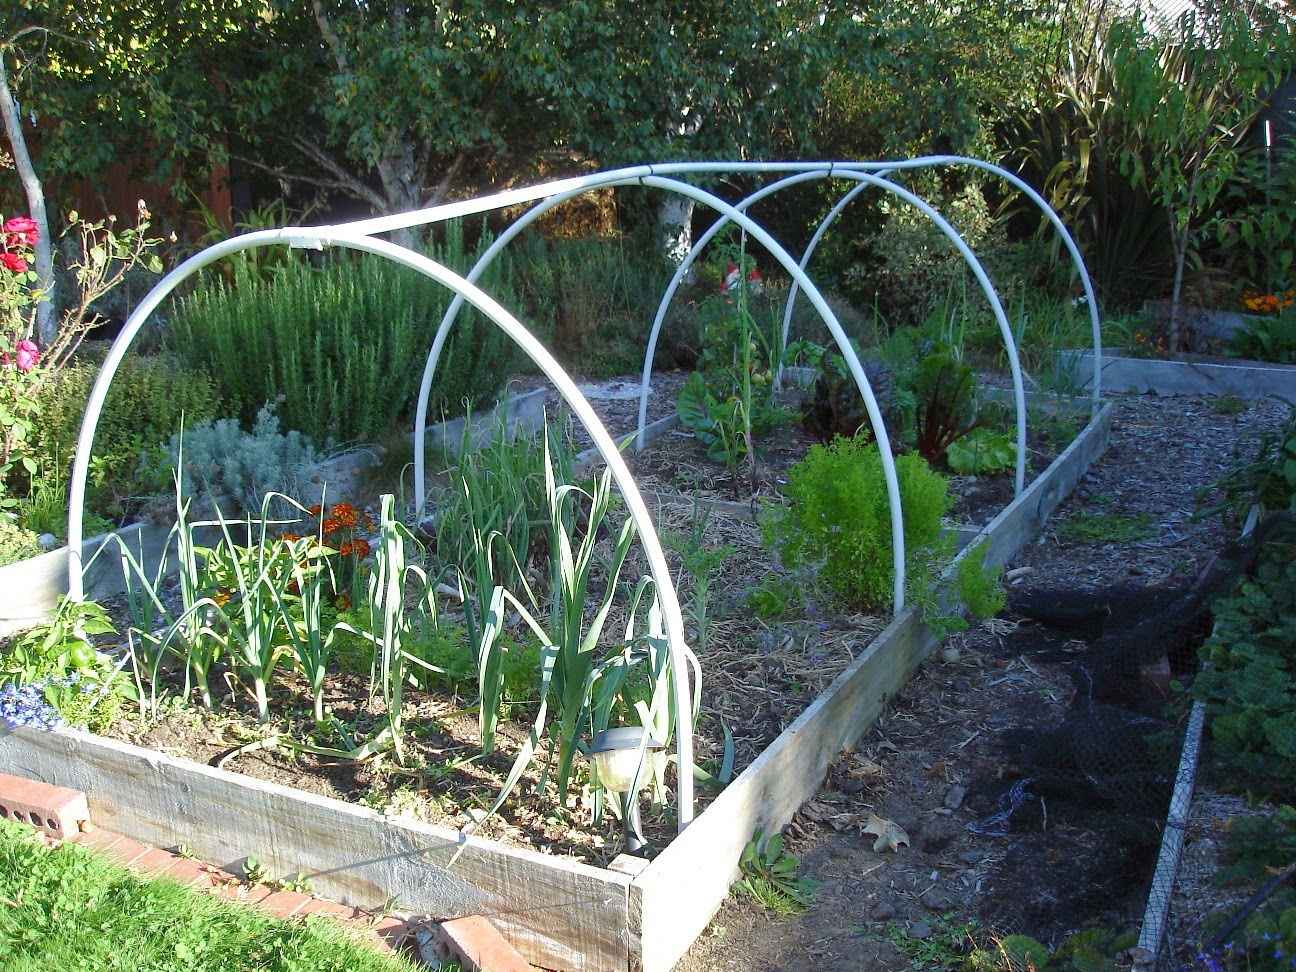
Next I needed to work out where the paths & beds would go. I wanted to use wooden frames to put my beds into, but didn't want to use treated wood despite everyone around me advising to the contrary. 'It won't last very long' they all said, but I really didn't want to, so I bought untreated wood. It came in 4.5 metre lengths, so to make things easier, I decided to make that the length of the beds, with 1.5 metre widths so that I could get 3 width pieces out of a 4.5 metre length. One on each end, and one across the middle dividing each bed into 2 parts. (Clever hey?) The wood was the most expensive part of the exercise.

I made 4 rectangular boxes 4.5 x 1.5m and the back one 4.5m x 1m as I could only get to it from one side. Because the lawn was an oval shape, I made a triangle bed for each end to fit in the curved shape, plus another smaller triangley wedge shape because there was a big gap. I worked out the width of paths by measuring how much room I would need for my wheel barrow to fit comfortably.


I did all the work myself - here is my other half making sure I did it right... Giving lots of advice!


I added a bird bath I had made to the middle, and voila!

On the paths, I covered the cardboard with the shredded bark. They're much cheaper than bark chips which had been used as mulch on the rest of the garden. I soon learned that you can't walk barefoot on shredded bark as it's full of splinters. They would even go through my rubber jandals (flip flops/thongs).

It was nearly Christmas by this time,  half way through the growing season. So to be able to grow straight away I filled 2 beds with a bought compost mixture, and planted them up. For the other beds I layered grass clippings, manure bought from various farm gates, vegetable scraps (this was before my hens!), coffee grounds from a cafe, peastraw, basically anything of plant or animal poo origin went in. It was amazing. I gave them a good soaking and topped them off with wet news paper and another layer of peastraw. I was planting in them by about March, and the plants just went bonkers!

So that's how it got built, more stuff coming soon, but here are some more pictures:


I'd love your comments!